Who would believe what possibilities and potential lie inside these neatly wrapped lozenges of colour? They are essentially chunks of pure dry pigment, more intense in colour than any tube of paint. The following exercises feature the 36 colours which I have selected for use by my workshop students being specifically appropriate for the local landscape where we paint in Wiltshire, however I recommend the starter set of 36 or 72.
To learn fully what pastels can do takes courage! Courage to take the wrappers off and break the pastels clean in half. You may smile but I can guarantee that if you do not do this then you have already placed limits on your ability to develop a full understanding of mark making. I shall return to the subject of mark making a little later. You may want to keep the wrapper on to keep your hands clean and it is possible to make beautiful and careful artwork simply using the tip of the pastel and many artists do, however, let that be your choice after you have learnt to use them in all their dimensions. It is essential that you allow yourself the opportunity to make a mess and get your hands dirty with pastel dust. In fact, it is a prerequisite.
The second lesson is that soft pastels might break and crumble so you might run out of some colours very quickly. If they don’t then you haven’t really used them. I mean really used them. For successful development you must find out what results are achieved by applying a variety of pressures. Discover their breaking point with the application of firm pressure and also gently stroke the paper with the lightest touch. Don’t be frightened of them, they won’t bite. They will, however, guided by your hand and intention, make the most beautiful marks of colour on your paper. If you should break one you can easily replace it as a single colour without having to buy another box set.
Exercise 1: Colour chart/unwrap/break pastels


This exercise is the first step on your soft pastel painting journey. You will need an A3 size sketchbook with white cartridge paper, either ring bound or soft cover so that you can bend the covers right back whilst working which you cannot do with a hard cover. Using the first page of your new sketchbook make a colour chart of your Unison Colour Soft pastels by stroking the pastel over the paper and write the colour code underneath. You can buy a colour chart and simply tick each colour but at this stage I recommend you physically do it yourself as this is your first practical experience with pastels. Then when all colours are recorded you can carefully take the wrappers off and break each pastel in half. Keep them stored in their original box as these are specifically designed to keep them safe. Now you are ready to make some marks.
Exercise 2: Mark making

I know you will be eager to paint your first masterpiece and you might have some photos at hand but please resist the temptation at this stage. If you are new to pastels then you are not quite ready. I say this because you might give up too easily when you discover that you couldn’t run before you could walk. Making a mark on paper is all about the practical gesture of the hand, the specific painting or drawing tool, in this case Unison Colour soft pastels, and the surface. Mark making using any medium involves energy, intention and action and none more so than with soft pastels.
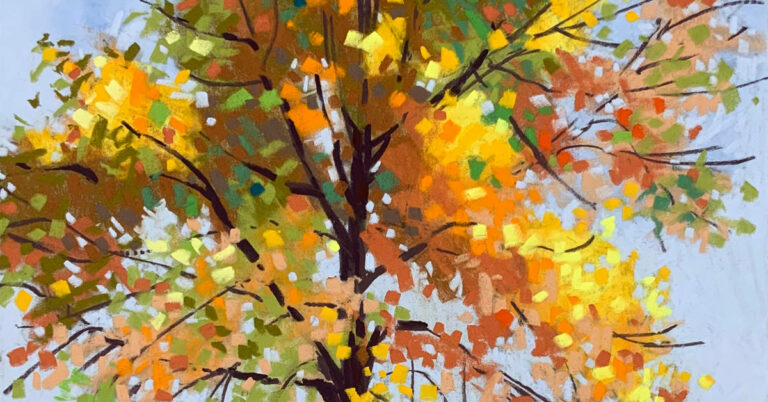
Get to know your pastels, your surface and your intention just as you would if you were learning a new craft. I encourage you to develop an attitude of enquiry and practice. The cartridge paper in your sketchbook is perfect for your initial mark making practice. Try out all of these gestures and movements with your pastels: push/drag/add pressure/gentle stroke/sharp edge/push roll edge/random roll edge/push twist dust/regular line/long fluid lines for grasses/cross hatching/scumbling/blending/mixing colours/line/wide sweep/line twist wide/wide twist line etc. These are just some of the ways of making your marks with soft pastels – you will discover more, creating your own style as you further your knowledge and experience.
Exercise 3: Work from observation


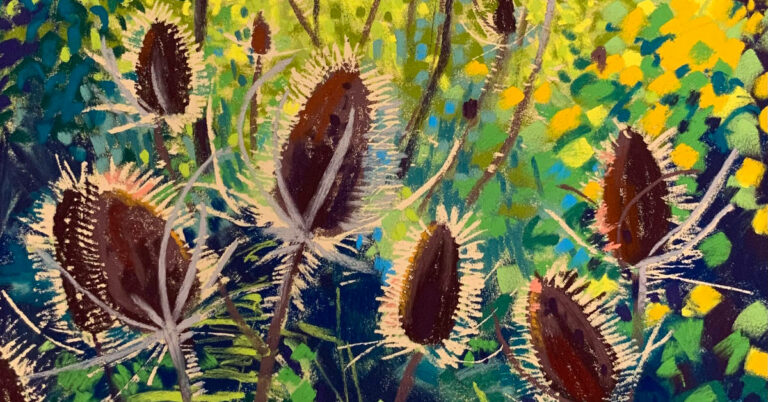
Working from observation is essential for the development of all artists and as a beginner it is important to set positive habits early on. With this in mind the easiest of subjects is fruit. Choose a few pieces of fruit and place them in front of you. Using your sketchbook again, have fun making some curved sweeping marks on the paper to replicate the round shapes of the fruit. The detail can come once you have practiced the shape and colour of each piece.
Get used to using the pastel on its side to make these broad sweeping marks. Overlay colours to get the varying tones and experiment with blending, compare results with unblended. When you have mastered single pieces then try a bowl of fruit, noticing the purply tones of the shadows that will add depth and observe where the light falls on each piece of fruit. You will discover an excitement when you reach each goal with these exercises and naturally look for the next challenge.
Exercise 4: Take your pastels outside


Continue working from observation but take your pastels and sketchbook outside. Whatever the season, make sure you are warm enough and comfortable. When working outdoors it is so easy to get cold and uncomfortable if you are not properly prepared and this will affect your concentration. Remember also that the result of this exercise will not be a pretty picture of your garden so much as a few pages filled with beautiful fluid marks of colour which will be your response to observing the plants, trees, flowers around you.
You don’t need to be focussing on detail but simply shape, colour and texture. Notice how trees and foliage rarely display straight lines in their growing habit so the more random you can make your marks then the more natural they will appear.
Exercise 5: Trying different papers and surfaces

You have been developing your observation skills and learning mark making techniques so now it’s time to try different papers.
Start a collection of traditional and non-traditional papers and cards. Attach a small sample of each approx 9.5×12.5cm in your sketchbook and include the names of each paper. Select a few pastels with which to experiment some marks on each surface.
To make your comparisons easier to identify then use the same marks and colours for each piece. What you will need to discover in this exercise is how each texture reacts in combination with the pastel marks, so use the pastels for wide sweeps of coverage, blended and unblended and also on their edge for fine lines. You will quickly see which paper characteristics you enjoy working with.
Soft pastel tips
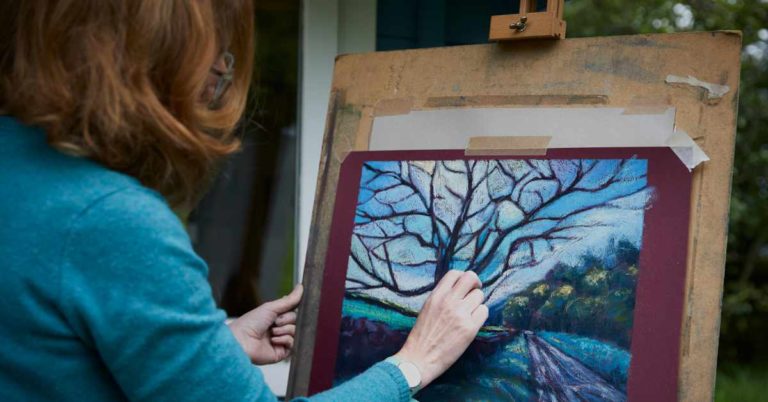
- When working on a drawing board, neatly tape your paper along each edge covering about a centimetre all round. When the painting is finished, and you take the tape off then you will have a clean edge with which to handle the painting and visually it gives you an instant frame.
- Avoid blowing the pastel dust off your paper, instead turn your paper over and either tap it from the back or shake it off.
- Hang an old towel on your easel so you can keep wiping your hands and cleaning your pastels to avoid colour contamination on your painting and if you work seated then lay the towel over your lap so it is always at hand.
- Always have a ready list of pastels that you would like to own to give to your friends and family when they ask you what you’d like for Christmas or Birthday. Buy as many Unison Colour pastels as you can afford. Mixing colours is not as ideal as having the ready-made colours available if you want to keep your work bright and intense.
- Collect ideas in your sketchbook in the form of quick notes as well as sketches so you start to build a bank of future projects. Sketch, draw and paint whenever you have a spare 20 minutes. You will soon be able to work quickly to capture information as well as develop your observation skills. Work from life wherever possible.
- Read and watch as many pastel painting videos and magazine articles as possible as well as blogs such as this one. Follow pastel artists and Unison Colour on social media for up to date news and techniques. Take physical local pastel workshops as well as online ones.
- Save any broken bits of pastel and pastel dust from your easel drip tray in little plastic pots so you can mix them with alcohol or water to use as paint.
- I recommend working at an easel with the drawing board vertical so all pastel dust falls off your painting. If your board is at an angle, then pastel dust as you are working will fall onto a lower part of your painting leaving colour where you do not want it. Working vertical at an easel is always preferable to working flat on a table.
I would be very happy to answer any of your soft pastel painting questions and would like to take this opportunity to welcome you to the soft pastel painting community and hope that you have an exciting and inspiring journey. Thank you for reading.
For further learning, Cathy has a Still Life course over at the Pastel Academy where she will be adding a new module every month throughout 2022 – 12 Month Still Life with Cathy Pearce | Pastel Academy


16 Responses
Very useful information; but l don’t think you mention fixing.
When l am pastelling l fix as l go…sometimes the immediate area l have worked on, sometimes the whole picture. Falling dust can be a real problem. l had a problem when mounting work in the early times. Regular fixing makes this less likely.
Sally
Thank you Sally. Fixing your work is really important and a whole other blog to write! In brief, sketchbook practice pieces such as the ones I suggest you do in the blog don’t really need to be fixed but do fix your best work for storage or framing. Fixing and the amount of pastel dust you create depends very much on how you work (pressure used and quantity of layers) and what papers you are using. In the beginning trial and error is very much how it will be as you start to adopt particular techniques etc. The best tip I can give you, however, is before the final spray turn your board upside down and give it a good bash a few times on the back to release that loose dust sitting on the top and then spray it. I recommend using Clairefontaine pastelmat, Sennelier pastel card or Fisher400/Uart sanded paper which all reduce the production of pastel dust. Best wishes with your pastel work.
Thank you very much for an interesting and comprehensive article. It’s just the kind of instruction and advice I need as a beginner.
Thank you David. I am so pleased you found this information useful. Hope you continue enjoying your journey with pastels.
Wow this is truly a great and helpful blog even to someone who has been using (and trying to learn more about pastels as l go). I will save this and perhaps try to print it off for quicker reference as sometimes you remember reading or seeing something that you thought at the time oh what a great udea then cant find or remember where.
So thank you Cathy l will be re reading and tryingbout some of your great tips please keep them coming
Hi Jean. I am so pleased you found this useful. There is so much information in all of these blogs by such a wonderfully diverse group of associate artists each with their own tips and skills that it is so worth trying out a little bit of what we all have to share and that way your knowledge and understanding of pastels will grow quickly and you will soon develop your own favourite techniques.
Best wishes on your pastel journey.
Outstanding blog! I’ve been pasteling for a couple year now, learning all the time. I appreciate your suggestions and will be rereading this as I keep on. Thanks!
Thank you so much for commenting Lori. I am so pleased you found new and helpful information here. Best wishes on your pastelling journey.
Thank you for your blog. I wish I had read something like this before I started using pastels. I have purchased many inferior pastels ,and paper before realising what i needed to get the best results. I also had not realised that they would also take me much longer to get to the result I wanted. My first box of unison were a gift, and I made the mistake of keeping them for that masterpiece that I always had in my mind. I eventually used them for a pet portrait course and WOW what a revelation. Havent looked back since. Your comment about breaking the sticks is such good advice as it gives you some very nice sharp edges to produce fine lines.
Thanks Cathy
Hi Susan, thank you for taking time to comment. I am so pleased you used and enjoyed your Unison pastels. We all rave about them for many different reasons but it is only when you handle them yourself do you really understand their quality. Inferior materials will give inferior results and this is usually when beginners give up and look for a different method.
You raise an interesting point about the time it takes to get the results you want. Well my advice to all beginners of pastels is you will be doing yourself a huge favour if you take away all preconceived ideas about what you want to achieve and forget the idea of masterpieces! That is all putting too much pressure on yourself, instead keep an open mind to learning as much about technique as possible and practice often. Pastel use is all about the mark and being a tactile material then confident handling takes time. Enjoy your journey with pastels Susan, have fun with them.
This is a very helpful guide and great for newcomers to the medium, an excellent introduction to using Unison pastels. I found Cathy’s related video about how to break (and why!) my new pastels very useful, as I’d managed to mangle a couple before I saw how to approach this essential task properly! (Cathy has kindly put that little video on the Unison Facebook post about this Blog).
Having read the advice to start practising with a sketchbook, I’m definitely in the ‘want to run before I can walk’ category! However, I shall make a real effort to start with the basics now, and the exercises are a great guide. Thanks, Cathy
My pleasure Jill and sorry to hear of your two casualties before you watched my video.
I use such bits for their new sharp edges but also for crumbling or scraping with a knife onto a painting to accentuate frothy blossom or sea spray, even a curdled sky although it is best to reserve this technique for the sanded type papers which will hold the dust well and remember to lay a sheet of scrap paper over the top so you can use your hands to press the dust into the grain surface.
Hope you enjoy getting back to basics.
Best wishes, Cathy
Hi Cathy, great advice, thank you. I am a total novice with pastels and got some for Xmas. I just bashed on with them and did a reasonable picture but with your advice I will now do some exercises before continuing. However can I revisit what to do with a completed picture, step by step please. How to store, what to spray it with and how to frame without smudging? Thank you.
Hello Shirley. It is so wonderful to hear that you got stuck into your new pastels straight away, exactly my message in the blog about not being afraid to use them. If you enjoy the exercises then you will begin to develop a loose, artistic way of using them which is expressive and exciting. I can see that it would be really useful to have a blog about spraying, storing and framing pastel paintings so I better get writing one! Best wishes Shirley and all pastel practice will help your work and artistic eye develop. Cathy
Hi Cathy
I Very much enjoyed your blog it is very Informative
I been doing Pastelsl for about 9 months iv got Unisons large set but as iv got bad lungs I’m finding the dust from them is affecting me I cough, so any advice I would be grateful for
Hi Marcella. Sorry to hear that you have a lung condition. These are a few things which will help you.
Wear a good quality face mask, one suitable for D.I.Y
Avoid blowing the dust away from your artwork.
Keep your face at least 30 cm away from artwork as you work.
Working on an easel with your board absolutely vertical will allow the pastel dust to fall straight down onto the drip tray rather than lingering on your work.
There are two particularly good pastel papers which are designed to limit loose dust on the surface; Clairefontaine pastelmat and Uart or Fisher400 sanded papers. More basic papers do not absorb the dust very well and so it just gets stirred up into the air when blending……..develop a style of working without using blending techniques.
If you have a garden space then set up an area to work outside as any excess dust will just dissipate.
I hope these suggestions will help you. Best wishes on your pastelling journey.